Jetson nanoとPCA9685でサーボを動かそうとするときのI2Cエラー対処法!
Jetson nanoとPCA9685でサーボを動かそうとするときのI2Cエラー対処法!をご紹介します!
目次
デフォルトのI2Cのbusはどこなのか特定できませんでした
これで、ハマる人がこれから増えると思います。
簡単なハックをすれば解決しますが、わからないと、なかなかハマります!
Traceback (most recent call last):
File "pca9685_smaple.py", line 17, in <module>
pwm = Adafruit_PCA9685.PCA9685(0x40)
File "/home/jetson/.local/lib/python3.6/site-packages/Adafruit_PCA9685/PCA9685.py", line 74, in __init__
self._device = i2c.get_i2c_device(address, **kwargs)
File "/home/jetson/.local/lib/python3.6/site-packages/Adafruit_GPIO/I2C.py", line 63, in get_i2c_device
busnum = get_default_bus()
File "/home/jetson/.local/lib/python3.6/site-packages/Adafruit_GPIO/I2C.py", line 55, in get_default_bus
raise RuntimeError('Could not determine default I2C bus for platform.')
RuntimeError: Could not determine default I2C bus for platform.
ここで一旦宣伝
私の著書「今すぐ試したい!機械学習・深層学習(ディープラーニング)プログラミングレシピ」がアマゾンで予約開始しました! 初心者向けなので、是非買って読んでみてください!(^O^)/
[amazonjs asin=”4798056839″ locale=”JP” title=”今すぐ現場で試したい! 機械学習・深層学習(ディープラーニング) 画像認識プログラミングレシピ”]
背景
さて、まずこの記事の背景を申し上げます。最近、Jetson nanoやDonkey Carなどが流行っていて、私も色々実験したいと思っています。
最近
Jetson nanoやDonkey Carなどの話が流行っていて、私も色々実験しようと考えていて
せっかくだから
出来るところは自作しようかなと思って
タミヤのものを買ったりしています。
今はまだ「雰囲気」ですが、色々試行錯誤したいと思います。
何よりふつうにオモチャとして遊びたいだけです。笑 pic.twitter.com/VbseomQjZJ— 著書:今すぐ試したい!機械学習・深層学習(ディープラーニング)画像認識プログラミングレシピ) (@kokensha_tech) 2019年6月10日
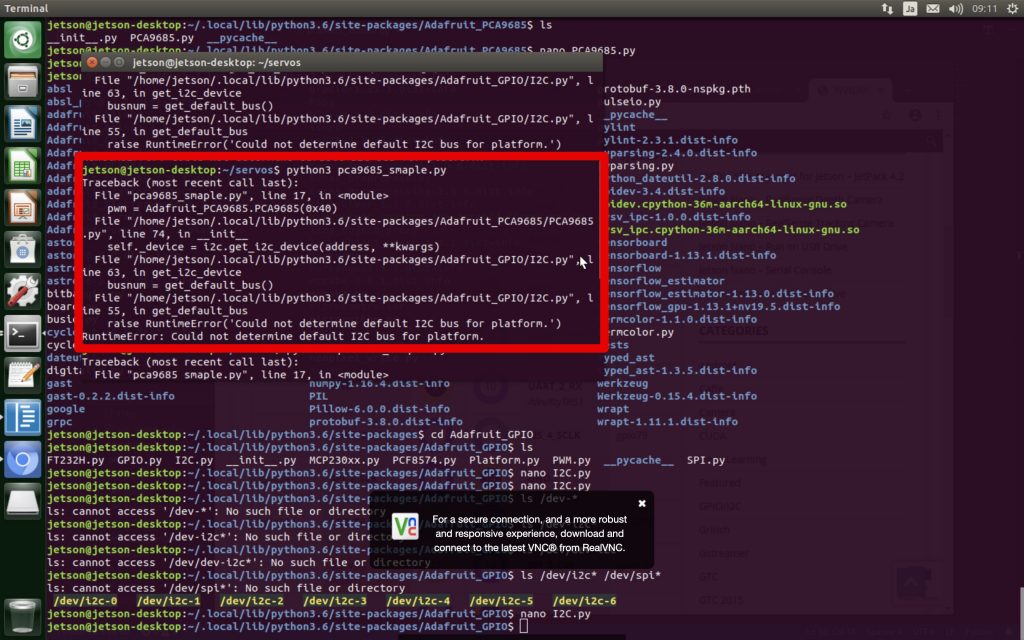
まさきに、確認したいのは、やはりJetson nanoからサーボ、ステップモーター、DCモーターの動かし方です。そこで、今までやっていたRaspberry PiとPCA9685のをJetsonでできないかと思ったわけです。しかし、一連の作業をして、「Could not determine default I2C bus for platform.」と言うエラーに遭遇しました。
Could not determine default I2C bus for platform.
これですね!
このマシン(platform)のデフォルトのI2Cのbusはどこなのか特定できませんでした!と言うことですね!
PCA9685を動かすための設定
本題に入る前に、そもそもPCA9685を動かすための準備をしなければいけません!
まずは必要なPythonソフトウェアの準備をします。
NvidiaのGPIO libraryをインストール
この部分の手順は下記のリンクを参照して、その通りに実施してください。
https://github.com/NVIDIA/jetson-gpio
PCA9685のパッケージをインストール
pip3 install Adafruit_PCA9685 --user
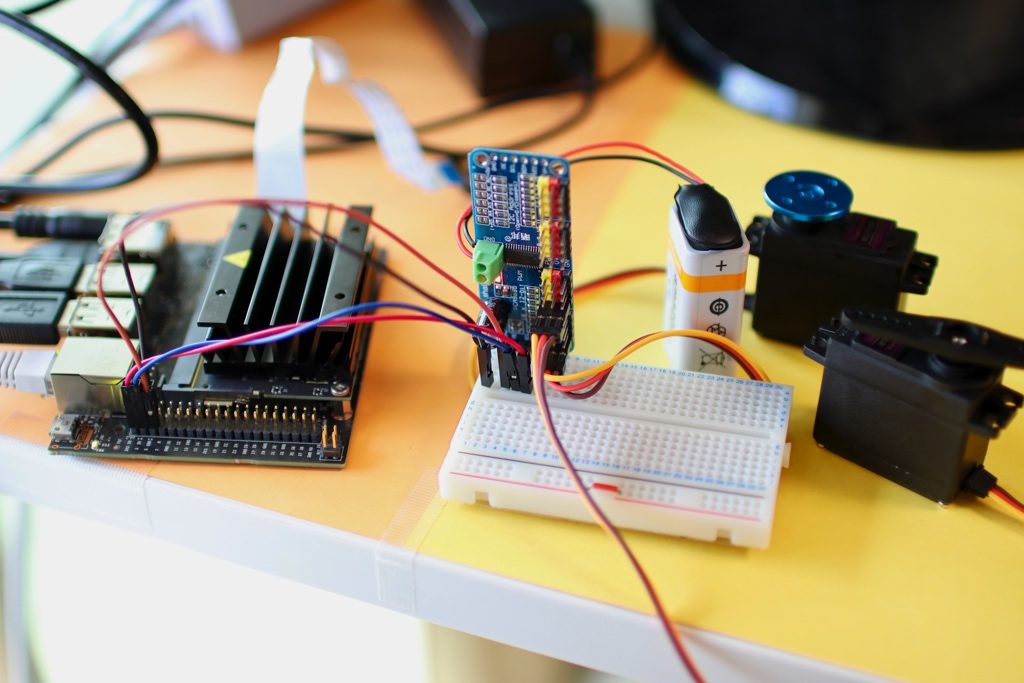
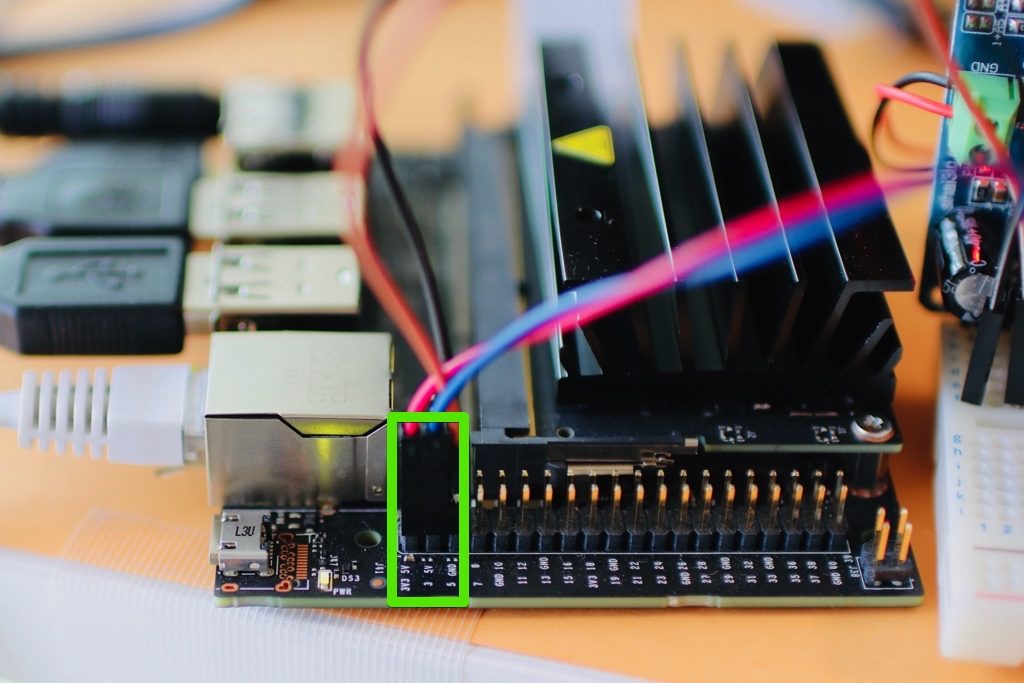
配線(Jetson nano とPCA9685と接続)
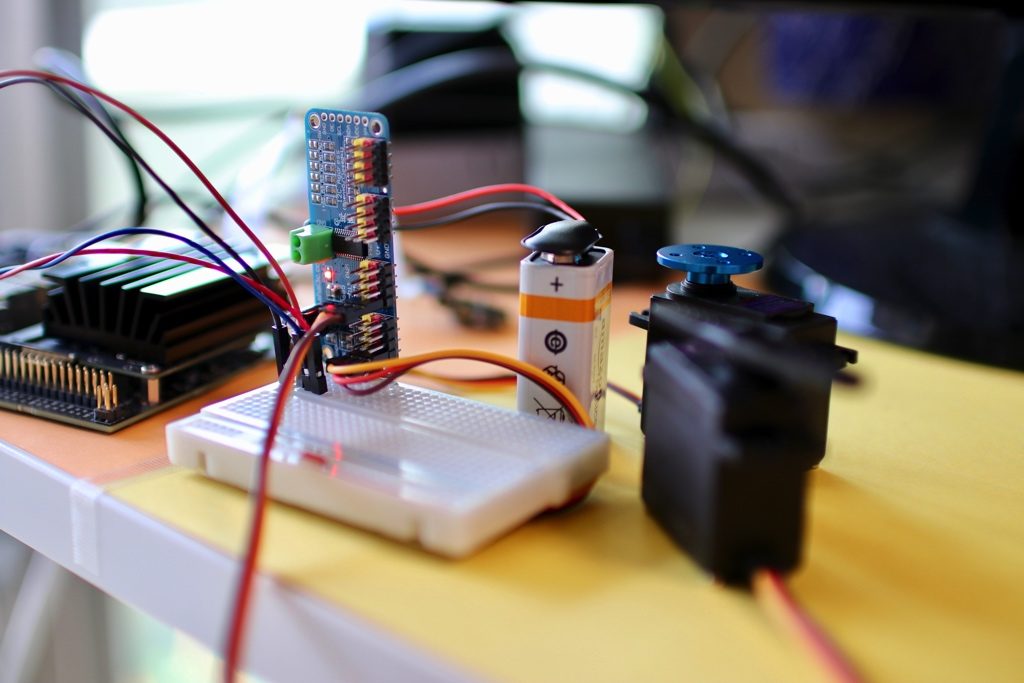
配線は、簡単です。合わせて、以前のRaspberry PiとPCA9685の記事も参照してください。
PCA9685       Jetson nano
VCC     <->    3.3v
SDL     <->    SDL(3)
SCL     <->    SCL(5)
GND     <->    GND
接続ができたら、下記の写真のようになります。もちろんサーボとサーボ駆動用の電源(バッテリー)も接続します。
接続の確認
sudo i2cdetect -y -r 1
下記のような結果になれば、問題ないです。
0  1  2  3  4  5  6  7  8  9  a  b  c  d  e  f
00:          -- -- -- -- -- -- -- -- -- -- -- -- --
10: -- -- -- -- -- -- -- -- -- -- -- -- -- -- -- --
20: -- -- -- -- -- -- -- -- -- -- -- -- -- -- -- --
30: -- -- -- -- -- -- -- -- -- -- -- -- -- -- -- --
40: 40 -- -- -- -- -- -- -- -- -- -- -- -- -- -- --
50: -- -- -- -- -- -- -- -- -- -- -- -- -- -- -- --
60: -- -- -- -- -- -- -- -- -- -- -- -- -- -- -- --
70: 70 -- -- -- -- -- -- --
プログラムは以前の記事に使ったものと全く同じプログラムとなります。
念のために、下に掲載しておきます。これ適切に名前をつけて保存します。(例えば、pca9685_sample.py)
# Simple demo of of the PCA9685 PWM servo/LED controller library.
# This will move channel 0 from min to max position repeatedly.
# Author: Tony DiCola
# License: Public Domain
from __future__ import division
import time

# Import the PCA9685 module.
import Adafruit_PCA9685


# Uncomment to enable debug output.
#import logging
#logging.basicConfig(level=logging.DEBUG)

# Initialise the PCA9685 using the default address (0x40).
pwm = Adafruit_PCA9685.PCA9685()

# Alternatively specify a different address and/or bus:
#pwm = Adafruit_PCA9685.PCA9685(address=0x41, busnum=2)

# Configure min and max servo pulse lengths
servo_min = 150  # Min pulse length out of 4096
servo_max = 600  # Max pulse length out of 4096

# Helper function to make setting a servo pulse width simpler.
def set_servo_pulse(channel, pulse):
    pulse_length = 1000000    # 1,000,000 us per second
    pulse_length //= 60       # 60 Hz
    print('{0}us per period'.format(pulse_length))
    pulse_length //= 4096     # 12 bits of resolution
    print('{0}us per bit'.format(pulse_length))
    pulse *= 1000
    pulse //= pulse_length
    pwm.set_pwm(channel, 0, pulse)

# Set frequency to 60hz, good for servos.
pwm.set_pwm_freq(60)

print('Moving servo on channel 0, press Ctrl-C to quit...')
while True:
    # Move servo on channel O between extremes.
    # ここ少し改造しました。今回はサーボ8個を動かしてみます。
    for i in range(8):
        pwm.set_pwm(i, 0, servo_min)
        time.sleep(1)
        pwm.set_pwm(i, 0, servo_max)
        time.sleep(1)
Terminalで下記のコマンドを実行します。
python3 pca9685_sample.py
そうすると、今回のテーマになっているエラーになります。
Traceback (most recent call last):
File "pca9685_smaple.py", line 17, in <module>
pwm = Adafruit_PCA9685.PCA9685(0x40)
File "/home/jetson/.local/lib/python3.6/site-packages/Adafruit_PCA9685/PCA9685.py", line 74, in __init__
self._device = i2c.get_i2c_device(address, **kwargs)
File "/home/jetson/.local/lib/python3.6/site-packages/Adafruit_GPIO/I2C.py", line 63, in get_i2c_device
busnum = get_default_bus()
File "/home/jetson/.local/lib/python3.6/site-packages/Adafruit_GPIO/I2C.py", line 55, in get_default_bus
raise RuntimeError('Could not determine default I2C bus for platform.')
RuntimeError: Could not determine default I2C bus for platform.
I2C.pyプログラムの修正(workaround)
写真のようにPCA9685のPythonパッケージにあるI2C.pyプログラムを修正します。
~/.local/lib/python3.6/site-packages/Adafruit_GPIO/I2C.py
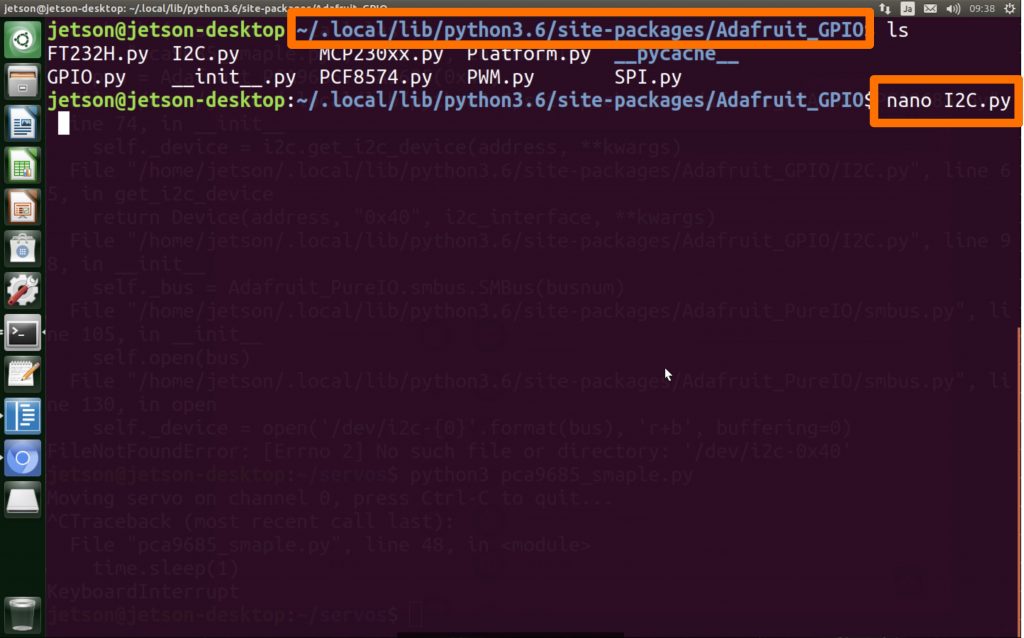

これは、pip3 install Adafruit_PCA9685 –userでインストールした時に、インストールされたファイルです。
このプログラムで、get_default_bus()の部分が何らかの原因(これはまたじっくり調査します。先に分かった人は教えてください。)で、うまくJetson nanoのdefaultのI2Cバス番号を取得できなかったのです。
ここでは、ハードコーディングになってしまいますが、直接に、”1”と設定します。
その理由は、今回、使っているのはJetson nanoの1番のI2C バスです。
Jetson nanoのピンアウトの配置も確認できました。
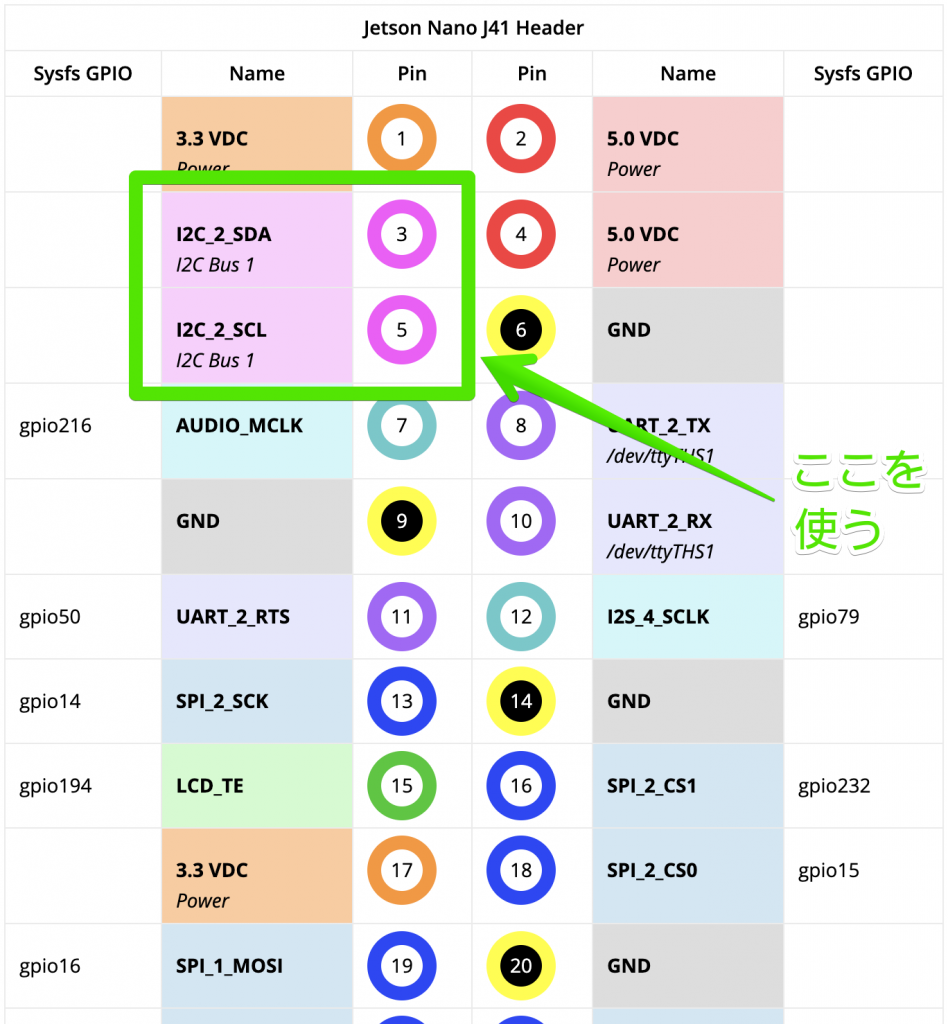
上のPinoutの引用先はこちらです。ありがとうございます!
従いまして、実際の接続に合わせて、プログラムを修正します。
def get_i2c_device(address, busnum=None, i2c_interface=None, **kwargs):
    """Return an I2C device for the specified address and on the specified bus.
    If busnum isn't specified, the default I2C bus for the platform will attempt
    to be detected.
    """
    # if busnum is None:
    #    busnum = get_default_bus()
    # return  ... busnum ...> get_default_bus
    return Device(address, "1", i2c_interface, **kwargs)
正常に動作しました!
上のプログラムを保存して、もう一回下記のコマンドを実行すれば、サーボは動くはずです!
python3 pca9685_sample.py
Jetson nanoとPCA9685が動いた!
ちょっとしたハックは必要!これが分からないと結構ハマるね! https://t.co/G1Wy36ycNT pic.twitter.com/rBsfxQyeFJ
— 著書:今すぐ試したい!機械学習・深層学習(ディープラーニング)画像認識プログラミングレシピ) (@kokensha_tech) 2019年6月11日
まとめ
いかがですか!これは、最初はなかなか意味が分からなくて、悩んでいました!
でも、流石にできないことはないですよね!一晩寝かして
Jetson nanoとPCA9685と繋げたら、エラーで進まないです。まだこの辺の情報が少ないですね。Donkey carにもPCA9685 を使っているようですが、似たエラーになる人はJetson nano foruoで一人いたぐらいですが、未解決のようです。
— 著書:今すぐ試したい!機械学習・深層学習(ディープラーニング)画像認識プログラミングレシピ) (@kokensha_tech) 2019年6月9日
今日はなんとかソリューションにたどり着けました!
皆さんもJetson nanoとPCA9685でサーボやステップモーターを動かそうとしてこのエラーに遭遇したら、この方法でやってみてください。
他のTensoFlowのセットアップや、最初の物体認識は、下記の記事をご参照ください。
では、御機嫌よう!
[amazonjs asin=”B07QQ9CFNP” locale=”JP” title=”NVIDIA Jetson Nano Developer Kit – 強力 AI コンピュータ 開発者キット”]
[amazonjs asin=”B01D1D0CX2″ locale=”JP” title=”HiLetgo PCA9685 16チャンネル 12-ビット PWM Servo モーター ドライバー IIC モジュール Arduinoに対応 ロボット”]
[amazonjs asin=”B07K7NK2TJ” locale=”JP” title=”PCA9685 16チャンネル 12-ビット PWM Servo モーター ドライバー IIC モジュール Arduinoに対応 サポート Raspberry Pi Zero/Zero W/Zero WH/ 2B/ 3B / 3B+ ロボット”]
[amazonjs asin=”B010SLRAAS” locale=”JP” title=”MG996R メタルギア・デジタルサーボ”]
platformioでESP32がwifiに接続まで試してみた!
Google AIY Vision Kit Raspberry Pi Zero WH簡単人工知能体験!(Python)
I don’t know which language is this but it works 🙂 best wishes from Turkey
Hi! Berk
Thank you for your comment!
This is Japanese language.
I am glad I helped! (^o^)/
Thank you for your tutorial. When I installed AdaFruit GIPO library based on the instruction provided in https://github.com/adafruit/Adafruit_Python_GPIO, this library was installed locally. Therefore, I could not find this GPIO folder under ~/.local/lib/python3.6/site-packages. I changed the I2C.py as you did, but it still doesn’t work for my program (the same error showed). Coud you give me some hints about my problem? Thank you !
非常に参考になり、ありがとうございました。但し、
”I2C.pyを修正することがなく、
busnum=”1″
i2c = I2C.get_i2c_device(address, busnum)
にすれば問題解決できる”と私が思いますが、
川島さん、
こんにちは、写真見たら、私も同じ駆動用の電源(バッテリー 9V 6LR61)を使ってたが、jetson自分の電源はすぐ落ちました、電圧は高すぎと思いましたね、あなたは9Vで出来たんだよね?なんか裏技がありますか?
ご質問いただいてありがとうございます。
ご質問の理解が間違ったら、すみませんが
9Vを使っているのは、jetsonの方ではなく、モータードライバPCA9685の方です。